Are you looking to renovate your home?
Well, it’s a great idea. It can be both an enjoyable and challenging experience.
Well, if you have a concert floor and you want to install glue-down hardwood floors on it.
So, it would be a great move. It is the most practical and rewarding option.
Why? Because It is durable and long-lasting to install glue down hardwood flooring on concrete.
Since it is bonded with adhesive, it can also be moisture resistant.
Now here a question arises: How to install glue-down hardwood flooring on concrete? Don’t worry about it.
Installing glue-down hardwood flooring on concrete might be a head-scratcher at first.
But with a little guidance and a dash of elbow grease, you’ll be walking on those beautiful planks in no time.
Whether you’re a seasoned DIY pro. Or just dipping your toes into the home improvement pool.
We’re here to make sure you nail that hardwood floor installation on concrete.
Is Concrete a Suitable Substrate for Hardwood Floor?
Yes, it is possible.
But still, it is possible to lay hardwood floors on concrete if it is dry, level, and properly prepared.
Yet, if moisture is present, it can lead to warping and cracking of the wood and can also cause mold and mildew.
It is important to protect hardwood flooring properly.
Preparing Hardwood Floor to Install on Concrete
- Acclimate Hardwood Flooring: Remove planks from the boxes and place them in the room in a sticker sack position. Leave them in the room for at least one day. It will allow the boards to adjust to the temperature and humidity of the room.
- Testing Moisture Levels in the Concrete: Lay a plastic sheet on the concrete and wait for a day. If there’s moisture under it, you might have a problem.
- Cleaning and Leveling the Concrete Subfloor: Before you start, clean up the concrete subfloor. Vacuum it, remove any stains, and get rid of adhesives. If there are high spots, you can grind or sand them down.
Step-by-Step Guide to Install Glue Down Hardwood Flooring On Concrete
Step 1: Supplies Needed
Tools:
- Utility Knife
- 1/4-inch spacers
- Vacuum Cleaner
- Rags and towels
- Plastic sheeting
- Measuring Tape
- Rubber Mallet
- Trowel or notched spreader
- Safety Glasses and Gloves
Materials:
- Glue down hardwood flooring
- Moisture barrier
- Flooring adhesive
- Cleaning solution
- Self-leveling compound
- Sealing Tape
- Level and straightedges
Step 2: Prepare the Concrete Subfloor
Ensure your concrete subfloor is clean, dry, and level.
Remove any debris, dust, or existing adhesives. Use a broom and vacuum cleaner to achieve a spotless surface.
If your concrete is uneven, consider using a leveling compound to create a smooth foundation.
Step 3: Install a Moisture Barrier
Lay down a moisture barrier over the concrete to protect your hardwood from any potential moisture seeping up from the subfloor.
Overlapping seams and securing the barrier with tape will create a watertight seal.
Step 4: Establish a Starting Point
Find the center of the room using a chalk line. This will be your starting point for laying the first row of hardwood planks.
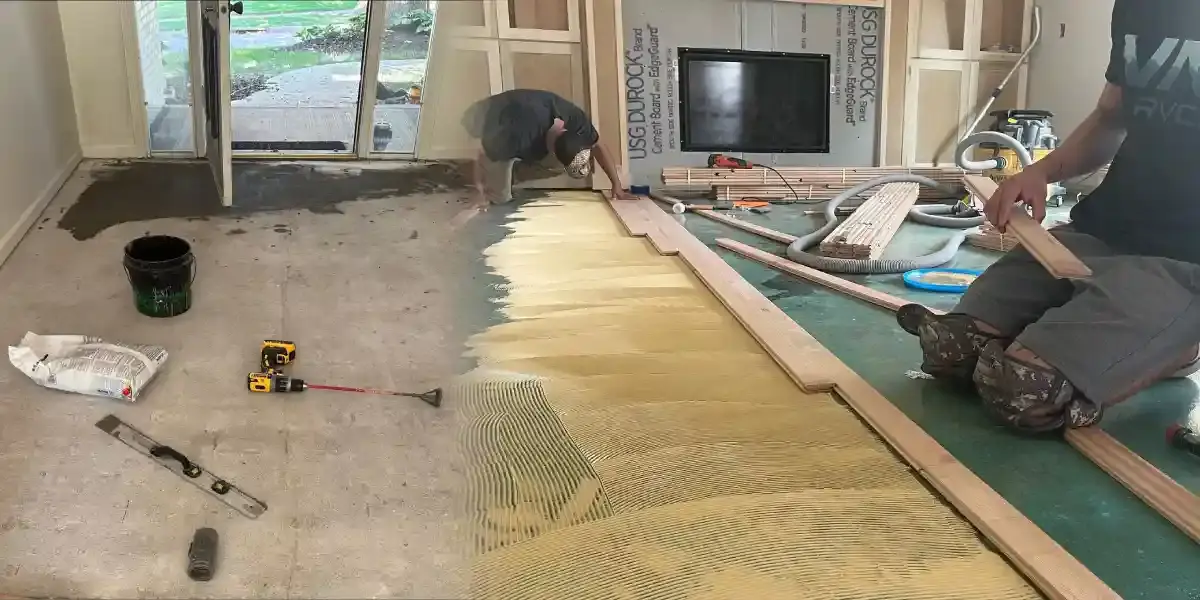
Step 5: Apply Flooring Adhesive
Using the recommended flooring adhesive, start applying it to the concrete in small sections.
Work in manageable areas to ensure the adhesive doesn’t dry before you lay down the hardwood planks.
Step 6: Lay the First Row
Carefully place the first row of hardwood planks along the chalk line, leaving a 1/4-inch gap between the planks and the wall.
Use spacers to maintain this gap, allowing the wood to expand.
Step 7: Continue Installation
Continue applying adhesive and laying down planks row by row.
Stagger the seams for a more natural look, and use a rubber mallet to tap the planks into place, ensuring a snug fit.
Step 8: Cut Planks as Needed
Measure and cut planks to fit the remaining spaces along the walls. A utility knife or a saw can be handy for this step.
Step 9: Roll and Secure the Flooring
Once all planks are in place, use a rolling pin or flooring roller to firmly press the hardwood into the adhesive. This ensures a secure bond.
Glue-down Installation: Pros and Cons
Pros
- The glue-down method reduces shifting and movement.
- Walking on the floor feels solid.
- Adhesives can prevent moisture-related problems.
- A glue-down floor contributes to a quieter environment.
- It improves a space’s visual appeal with a seamless appearance.
Cons
- Installations with glue-downs are time-consuming.
- It can be challenging to remove glued-down planks.
- Concrete subfloors must be clean, level, and moisture-free.
Tips for Maintenance and Care After Installation
- Daily Cleaning Routine: Use a soft-bristle broom or a vacuum with a hardwood floor attachment to prevent damage. Also, avoid excessive water on the floors, as standing water can damage the wood.
- Protective Furniture Pads: Attach felt or rubber pads to the legs of furniture. To prevent scratches and dents when moving or rearranging items.
- Area Rugs and Mats: Place area rugs or mats at entry points. To capture dirt and moisture, preventing them from being tracked onto the hardwood floors.
- Temperature and Humidity Control: Maintain a stable indoor climate. To prevent excessive expansion or contraction of the wood. Use a humidifier or dehumidifier as needed.
- Immediate Spill Cleanup: Wipe up spills using a soft, dry cloth. To prevent any liquid from seeping into the wood and causing damage.
- Periodic Inspection: Inspect the flooring for any signs of wear, scratches, or damage. Address issues promptly to prevent further damage.
- Avoid Harsh Cleaning Products: Use hardwood floor cleaners recommended by the flooring manufacturer. Avoid harsh chemicals that can damage the finish.
Check Out More Articles Related to Hardwood Flooring
- Can Hardwood Flooring Acclimate in The Box? (Explained)
- Do Hardwood Floors Make Your House Colder? (6 Helpful Facts & Tips)
- The Best Way to Install Hardwood Flooring Over Tile (8 Easy Steps)
- Choosing the Right Underlayment for Hardwood Flooring (7 Best Reasons)