Thinking about giving your home that cozy and timeless vibe?
Well, hardwood flooring might just be the answer!
Why?
Because it’s not just durable but also naturally charming, making it a favorite among homeowners.
Plus, it’s super versatile, fitting into any room seamlessly.
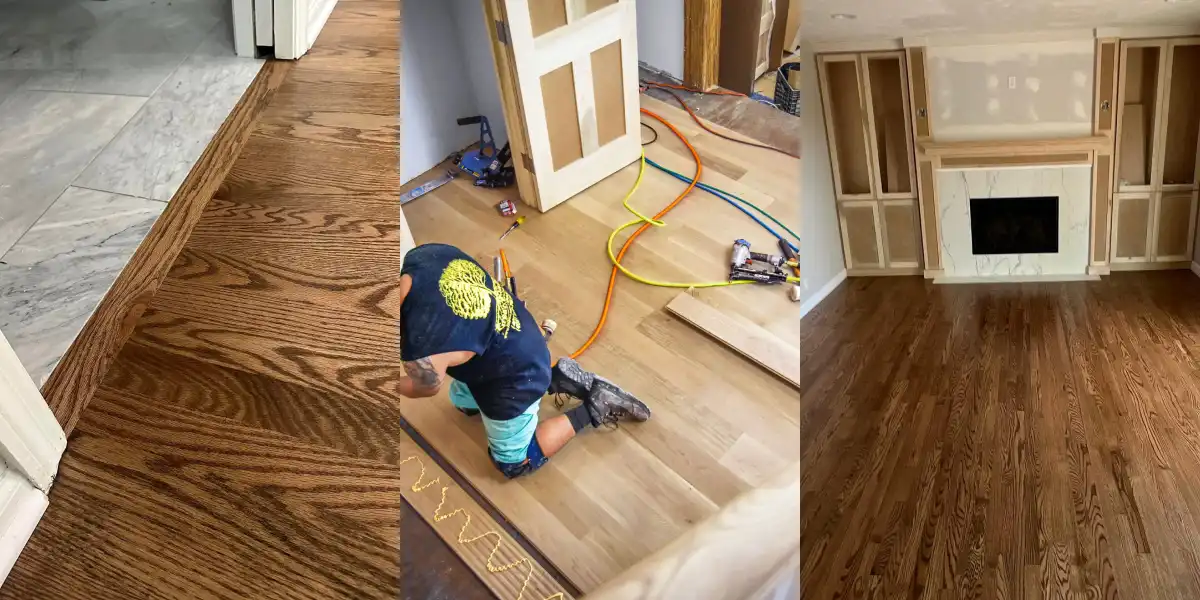
If you currently have tile flooring and are thinking about switching to hardwood.
Then you might be wondering if you can install hardwood over tile.
Yes, it is possible to install hardwood flooring over tile.
But, it depends on the type of tile and the thickness of the hardwood flooring.
Learn how to install hardwood floors over tiles by reading this article in its entirety.
Factors to Consider Before Installation
1. Evaluating the Condition of Tile Flooring:
When you’re thinking about installing hardwood on top of the tile, it’s important to look at the condition of the tile.
Consider the type of tile surface and whether the tiles are in good condition.
Also, you should check for cracks and make sure they are safely attached to the subfloor.
Moreover, if you spot any damaged or loose tiles, it’s best to replace them.
Don’t install hardwood over damaged or loose tiles. It’s best to remove them.
2. Height Differential and Transitions:
It’s important to consider height differences when putting hardwood over tile.
Watch out for any issues with doors – the extra height might cause problems there.
If your tile floor is already at the right level, you can lay hardwood right over it.
You just need to make sure the doors, appliances, and everything else fit.
It’s easy to blend your new hardwood floor with your existing tiles if you plan carefully.
3. Moisture and Humidity Levels:
Climate is another important factor to consider before installing.
If you live in a humid environment, engineered hardwood flooring is the best choice.
Do you want to install hardwood floors in moisture-prone areas?
In moisture-prone areas like bathrooms and kitchens, consider humidity levels.
A wrong decision could damage your home’s appearance.
4. Preparing the Tile Subfloor for Hardwood Installation:
A stable and even subfloor is important for proper installation and longevity of hardwood.
If the tiles have damage or voids, repair or replace them.
If the tiles have a shiny surface, scuff them to improve adhesion.
To prevent unevenness on the subfloor, level it as needed.
5. Cleaning and Removing Debris:
You need a clean surface before installing hardwood floors.
So, clear away any loose stuff, dust, or dirt on the tile surface.
Using a vacuum or a good cleaning will do the trick.
If there’s still some leftover dirt, just give it a wipe with a damp cloth.
That way, you’ll have a nice, clean surface to work on.
6. Repairing Damaged or Uneven Tiles:
Damaged or uneven tiles must be repaired before installing hardwood flooring.
Any tiles that are cracked, chipped, or loose should be replaced.
The surface must be leveled with a suitable leveling compound or by a grinder to remove any high spots.
A Step-by-Step Guide to Install Hardwood Flooring Over Tile
Step 1: Supplies Needed
Tools:
- Measuring tape
- Chalk line
- Circular saw, or miter saw
- Pry bar
- Hammer
- Adhesive applicator or trowel
- Tapping block and level
- Pull bar
- Rubber mallet
Materials:
- Hardwood flooring
- A moisture barrier or underlayment
- Wood adhesive or flooring glue
- Transition strips (if needed)
- Finishing nails (if needed)
Step 2: Preparing the Subfloor for Installation
Cleaning the Tile Surface
Begin by vacuuming the tile surface to remove loose dirt, dust, or debris.
Pay attention to the corners and edges where dirt can accumulate.
Check the tile surface for damaged or cracked tiles. Replace them as needed to ensure a solid and even subfloor.
Also, check for uneven areas with a level and straight edge.
Remove any low spots using a sanding or self-leveling compound.
Smoothing Out Imperfections
Before installing hardwood, clean the subfloor to remove debris and smooth out imperfections.
Use a trowel to spread the floor-leveling compound evenly across the lower spots.
To remove dust or debris from the subfloor, sweep it again.
Moisture Barrier Installation
To prevent moisture damage it is important to clean and dry the subfloor before installing a moisture barrier.
Cover the entire area with the moisture barrier, leaving an overlap of 2-3 inches at the edges.
For sealing barrier seams, use moisture barrier tape.
Step 3: Acclimating the Hardwood to the Environment
You must get hardwood floors used to the environment to make sure they will last a lifetime.
Once you’ve taken the planks out of their box, don’t be rushed.
Feel free to let them hang out and get comfortable. Keep the room at the right temperature and humidity.
Note: Don’t stack the planks on top of each other. Provide them with some breathing space. Place them on the subfloor, but make sure air can move around them.
Check the moisture levels in both the hardwood and subfloor regularly to make sure everything is running smoothly.
As a result, your hardwood floors will settle in and stay in great condition.
Also See: Can Hardwood Flooring Acclimate in the Box? (Explained)
Step 4: Removing Baseboards and Trim
Get yourself a pry bar, a hammer, and a utility knife. To keep your walls safe, use scrap wood.
The first step is to gently pull the pry bar between the wall and the trim or baseboard.
When the baseboard or trim is visible, remove the nails or staples.
And don’t forget to label and store those baseboards and trim for later.
Step 5: Apply Adhesive or Mortar
Use a recommended adhesive or mortar to secure the hardwood planks to the tile surface.
Follow the manufacturer’s instructions for application.
Step 6: Install Hardwood Flooring
Begin installing the hardwood planks, starting in one corner of the room.
Follow a staggered pattern for a more natural and aesthetic look.
Use spacers to maintain proper expansion gaps.
Secure the hardwood planks in place using a flooring nailer or adhesive, depending on the installation method chosen.
Continue installing the hardwood planks row by row until the entire floor is covered.
Trim the last row to fit if necessary.
Step 7: Allow for Expansion Gaps
Leave expansion gaps around the perimeter of the room to account for any movement in the wood.
These gaps can be covered with baseboards or trim.
Step 8: Finish the Hardwood
Once the installation is complete, finish the hardwood floor according to your preferences.
Whether it’s staining, sealing, or applying a protective finish.
Pros and Cons of Installing Hardwood Over Tile
Pros
- Installation of hardwood floors saves time, money, and repairs.
- Tile surfaces provide a stable and flat base for hardwood installation.
- Installing hardwood over tiles can make adjacent rooms more level.
- The removal of tiles creates dust and debris, which can be irritating.
- It keeps rooms warmer during colder months with hardwood insulation.
Cons
- Laying hardwood over tile may damage a subfloor with major dips or cracks.
- Over time, dust and dirt can get trapped between the wood planks.
- Exactly prepared subfloors might trap moisture, causing mold.
More On Hardwood Flooring:
- Can Hardwood Flooring Acclimate in The Box? (Explained)
- 7 Best Canister Vacuum for Hardwood Floors (Must-See!)
- Cork vs. Rubber Underlayment: Which One Should I Choose?
- Cork vs. Foam Underlayment: Which One Should I Choose?