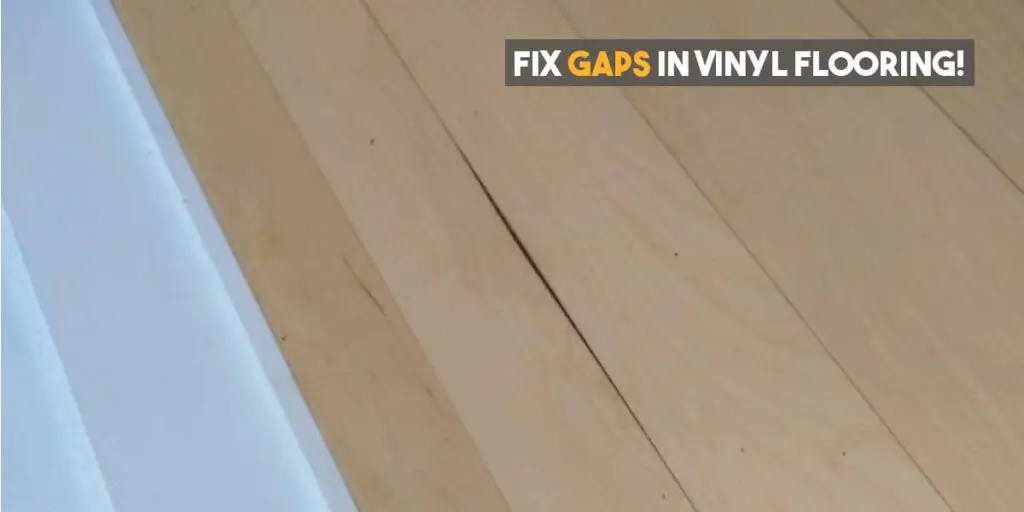
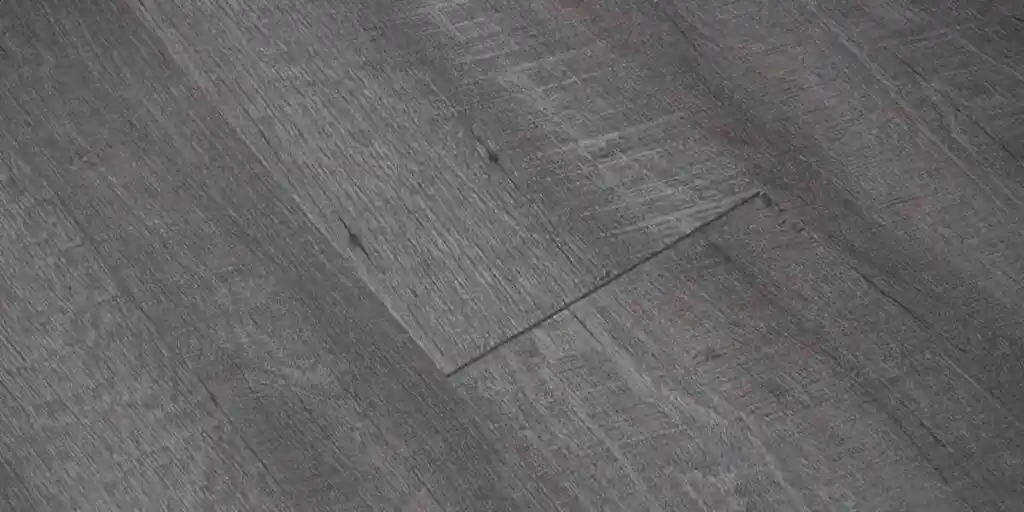
Over time, vinyl plank flooring shifts and leaves gaps between them.
Gaps on the vinyl plank floor are critical and pose problems on the surface.
Like peeling, chipping, cracking, scratches, and crumbling at the edges.
So, it would be wise to fix the gaps to maintain the aesthetic and elegance of the floor and its lifetime.
It is worth fixing the gaps. Since vinyl floors are cost-effective and durable.
And resistant to elements such as humidity, mold, and mildew.
Below are some methods to fix gaps in vinyl plank flooring. Depending on the flooring installation.
You Might Also Like:
- Can Mold Grow Under Vinyl Plank Flooring? (Answered)
- 6 Reasons Why Your Vinyl Plank Floor Buckling- With Solutions!
Types of Vinyl Plank Floors
Vinyl plank floor comes in three main types. They include:
- Glue-down vinyl plank floor: This type of vinyl flooring is glued down with glue to hold the vinyl plank floor in place.
- Click-in vinyl plank floor: Click-in vinyl plank comes with pieces designed with tongue and groove. As the interlocking system to fit them together.
- Loose-lay: With this type of vinyl floor, nothing holds them in a place, neither by glue nor clipping. Instead, they are loosely aligned, and they stay in place through the backing of friction.
Prerequisites Before You Start Fixing Gaps on Vinyl Flooring
- Mop the floor to get rid of debris and dirt build-up in the gaps, or you may vacuum for the best outcome.
- After moping, wait for about 4 hours to allow the floor to dry for the adhesive to seal the gap. Use your finger to confirm or check if the gap is dry as you desire.
How to Fix the Gaps on Glued or Clicked-In Vinyl Flooring?
We recommend using the Caulking method to fix glued or clicked-in vinyl flooring gaps.
Caulking is the best because it helps fill and solidify the gaps and is water-resistant.
Select a caulk made from latex, silicone, or acrylic. All these are effective, but silicone is the most preferred.
Because it can withstand high-temperature climates and harmful conditions.
But acrylic would serve that purpose. If you want caulking that can strengthen and extend the life of floorboards.
For minimal scent and desirable-size expansion, you should opt for latex.
Lastly, use a caulk that matches the color palette of your planks.
Be it while wet and dry because some caulk changes once dry.
Must See: Can you Caulk Around Vinyl Flooring? (All You Need to Know!)
Step 1: Clean the Floor
Mop/vacuum and dry the floor as suggested from the ABOVE.
Step 2: Mask the Edges of Vinyl Planks
Mask the edges of planks where you intend to fix the gap using masking tape.
This will prevent the caulk from smearing and sticking plank top surface.
Step 3: Add Some Caulking in the Gaps
Add some caulking to the gaps between the planks.
Ensure you apply under the holes and gap edges using a putty knife.
Fill the adhesive under the gaps using a putty knife and remove excess glue off the floor after cleaning the joint.
Step 4: Remove the masking tape
Once done, remove the masking tape.
Use a wet sponge to remove the adhesive that might have dropped or smeared on the floor.
Step 5: It’s Done. Give Sometimes to Dry
Allow the caulking to breathe according to the manufacturer’s instructions.
And confirm it is hardened before you allow traffic on it.
Alternative Ways to Fix the Gaps on Glued or Clicked-In Vinyl Flooring
Aside from caulking, you may also use other alternatives to fix glued and click-in vinyl flooring gaps. They include;
Use Epoxy Resin
Epoxy resin is a water-resistant adhesive like silicone.
Yet, epoxy resin is ideal, while the gaps are still small.
Administer a small amount of the adhesive under each opening and hole.
But ensure you have covered the top edges of the vinyl like in the caulking method.
Note: Epoxy resin is toxic to inhale. Thus, ensure you wear a face mask and that the space /room is well-ventilated to avoid suffocation.
Inserting small parts of Wood or Plastic
This method is ideal for all types of vinyl flooring.
Especially when the gaps are wider and deeper because they cause drastic measures.
Take small wood or plastic parts, and place them under the gaps. And then use glue to bond and waterproof the vinyl flooring.
How to Fix Gaps in Loose-Lay Vinyl Plank Flooring?
When it comes to loose-lay vinyl plank flooring, fixing the gaps between planks is a simple task that can be completed in a few minutes.
There are various methods you may use. They include;
Use a Suction Cup and a Rubber Mallet
First, mop or vacuum around the plank you intend to fix. Add some caulk or wood putty to the gap, then attach a suction cup.
After attaching the suction cup, hit it with a rubber mallet to close the gaps.
And bring the planks back to their original position.
Once done, remove the excess caulk or wood putty using a clean damp cloth or wet finger.
Using A Scrap Piece And Double-Sided Tape
If you feel that a suction cup is unfriendly to the texture of your vinyl floor.
Then use the double-sided tape method to fix the gaps.
Attach a scrap piece of wood to a double-sided tape.
Peel the other side of the tape and then attach the scrap to the vinyl plank that needs fixing.
After attaching, use a rubber mallet and hit gently toward the gap you want to close.
Using this method will yield more gaps nearby.
So, it’s advisable to keep on closing the gaps until the gap behind the baseboard is hidden.
How to Prevent Vinyl Plank from Developing Gaps?
The vinyl plank floor may develop gaps due to changes in temperature, moisture issues, high traffic, and moving heavy objects or furniture.
Also, not allowing for a perimeter for natural expansion towards the wall while installing vinyl flooring may also buckle.
Especially with loose-lay vinyl type.
Below are some precautions to prevent vinyl plank flooring from developing gaps. They include;
- Avoid Exposure To Sunlight: You may either hang a blackout/thermal curtain. Or apply a UV film or glass tint directly to the windows to cut heat and UV transfer into the room.
Must See: Does Vinyl Flooring Fade in the Sun? (6 Ways to Prevent From Fading)
- Use High-quality Adhesive: Ensure you use a top-quality adhesive. Plus, you apply it properly according to the manufacturer’s guide to achieve the best result.
- Use a Roller to Secure the Floor: After installing the flooring, you should roll the floor with a 100-pound roller. To secure the flooring and adhesive to the subfloor in every area.
- Moisture Issues: Look for molds and mildew as they state moisture/humidity issues in the flooring. If you come across them, fix the problem immediately.
See Also: Best Ways to Get Rid of Moisture Problems in the Home
- Moving Heavy Objects: Use heavy furniture sliders to move heavy objects around to lessen the floor damage.
Must See: 5 Best Ways to Protect Vinyl Flooring From Heavy Furniture (Must-Try!)
- Leave Gaps at the End of Flooring: When installing the vinyl flooring, leave between a quarter-inch and a half-inch shy of the wall to allow the vinyl floor to expand and contract. Due to a temperature change naturally.
Must See: Do I Need Expansion Gaps for Vinyl Flooring? (Explained)
FAQs: How to Fix Gaps in Vinyl Plank Flooring?
Can you Fill Gaps in Vinyl Plank Flooring?
Yes. There are several ways you can fill in the gaps in your vinyl flooring.
One way is caulking, and other methods are mentioned in this article.
Check out the full article to learn which way is suitable for which type of vinyl flooring.
Moreover, the caulking method is suitable for all types of vinyl flooring.
What do you use to Fill Gaps in Vinyl Plank Flooring?
To fill the gaps in vinyl plank flooring, you can use small parts of wood or plastic, or even you can use epoxy resin.
When the gap is wide and deep, inserting small pieces of wood or plastic is an ideal job.
But if the gap is relatively small, using epoxy resin is the perfect thing to do.
What Causes Gaps in Vinyl Plank Flooring?
Generally, vinyl floors cause gaps due to direct exposure to sunlight, various moisture problems, and frequent movement of heavy objects on the floor.
Moreover, you can fix the issue in many ways mentioned in this article.
Check which method is best suited for your type of vinyl flooring.
Read More on Vinyl Floors
- Can you Caulk Around Vinyl Flooring? (All You Need to Know!)
- Do I Need Expansion Gaps for Vinyl Flooring? (Explained)
- How to Fix Vinyl Flooring Seams? (A Step By Step Approach)
- 5 Best Ways to Protect Vinyl Flooring From Heavy Furniture (Must-Try!)
- 5 Reasons Why Your Vinyl Plank Floor Buckling (Guide To Fix It)

What kind of double sided tape do you recommend?
Hello Jane, you can go for Gorilla Tough & Clear Double-Sided Tape, or you can go for FYChiCheng Double-Sided Tape. Both are available on Amazon.