Ever wonder why some vinyl floors seem to have that extra bounce, that cozy feel? Well, here’s the not-so-secret ingredient: plywood underlayment!
Yep, it’s like the unsung hero quietly doing its job beneath your feet.
Having plywood underlayment for your vinyl flooring is a game-changer. From added comfort to durability, we’re breaking down the benefits and telling you why it’s not just an option but a flooring essential.
Also, plywood underlayments are tough against water and super strong structurally.
Now, if you’re all excited about giving your vinyl floors this upgrade but feeling a bit unsure about the whole installing thing, don’t stress!
This article is like your handy sidekick. Here to walk you through the steps of getting plywood underlayment under those vinyl floors of yours.
Ready to dive in and make your floors extra awesome? Let’s do it!
How to Select the Right Plywood Underlayment for Vinyl Flooring?
1. Considerations for Moisture Resistance and Stability
The underlayment should resist moisture and maintain its structural integrity. It should also be able to withstand environmental changes in temperature and humidity.
Choosing plywood with a moisture-resistant rating, such as AC grade or higher, is best.
Choose warp-free or delaminated plywood, at the very least, if you want it to last. It will protect against moisture damage, especially in humid or moist areas.
2. Measure the Subfloor Thickness
Choosing plywood underlayment for vinyl flooring requires measuring the subfloor thickness. Identify a floor vent or edge of the subfloor where you can access the tiles. And measure their thickness with a tape caliper.
It is recommended to use plywood underlayment that is thicker than the subfloor. Typically, 1/2 inch thick will be enough for most subfloor thicknesses.
Choosing the right plywood thickness ensures stability. It prevents flexing and promotes a smooth installation.
3. Choose the Right Plywood Type
When choosing plywood underlayment for vinyl flooring, pick the right type of plywood.
Marine-grade plywood is the best choice for underlayment. It is made with waterproof glue, and it is strong and durable.
Regular plywood is not recommended for this purpose as it is not as strong and may warp over time.
Underlayment should generally be 1/4 inch thick. But 1/2-inch plywood offers added stability and support. With thicker plywood, you can prevent flashing and have a more solid vinyl flooring base.
4. Consider the Plywood’s Core Material
Since plywood is typically made of wood veneers and a wood core, it is important to select plywood with a hardwood or softwood core.
Because the core material affects the strength and stability of the plywood.
Just for the information, hardwood core plywood is stronger than softwood core plywood. While softwood core plywood is more flexible and lightweight.
The right core material should be chosen based on the intended application.
5. Certified Suppliers & Reputable Suppliers
A vinyl flooring underlayment should be certified by either the APA (Engineered Wood Association) or the FSC (Forest Stewardship Council).
The certification of plywood by APA and FSC ensures that it meets industry standards.
Plywood that meets the highest quality, durability, and environmental standards is ideal for vinyl flooring underlays.
Furthermore, vinyl flooring should be installed using plywood underlayment from a reputable vendor. Also, you can choose from various options that meet your requirements from reputable plywood suppliers.
Also See: Complete Guide: Underlayment for Vinyl Sheet Flooring
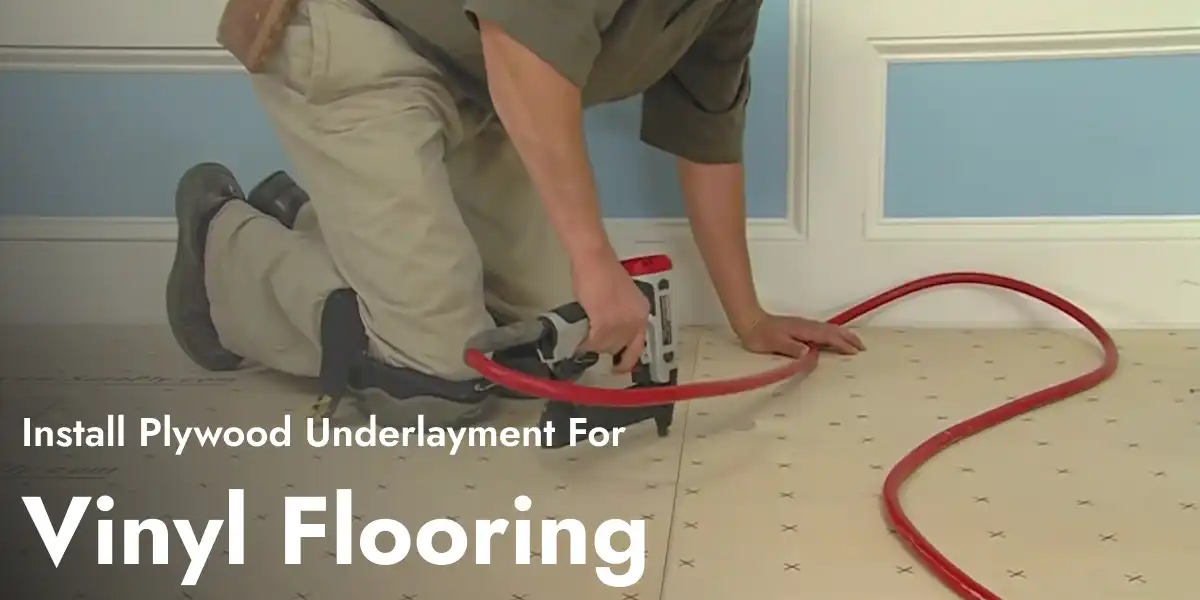
How to Install Plywood Underlayment For Vinyl Flooring? A Step-By-Step Guide.
Step 1: Gather All Necessary Tools & Materials
Gather the tools and materials needed to install plywood underlayment for vinyl flooring:
- Plywood sheets (1/4 to 1/2 inch thick, AC-grade)
- Circular saw or Table Saw
- Tape Measure & Pencil
- Leveling compound
- Knee Pads
- Floor scraper
- Hammer
- Spirit level
- 1/8-inch spacer
- Vacuum cleaners
- Seam filler (as recommended by the manufacturer)
- Nails or screws 5/8″ coated
- Vinyl Flooring & Adhesive
Step 2: Subfloor Preparation
Installing plywood underlayment for vinyl flooring begins with subfloor preparation.
Start by cleaning the subfloor thoroughly. Remove any debris, dirt, or dust from the surface.
Next, inspect the subfloor for cracks or holes. And if find any then fix these issues ASAP.
You can use a leveling compound or self-leveling underlayment to level uneven areas. This step is necessary. These can cause the plywood underlayment to sit unevenly. It leads to issues with vinyl flooring installation.
Also, check for nails, staples, or other fasteners sticking out.
These can cause bumps or prevent plywood underlayment from lying flat. Smooth the surface by carefully removing protruding nails, staples, and pliers.
Lastly, ensure the subfloor is dry using a moisture meter, and allow for proper ventilation.
Step 3: Underlayment Material Preparation
Now is the time to prepare the underlayment just as we did with the subfloor.
Gather all the tools and materials needed for installation. Then prepare the underlayment material.
Start by measuring the installation area, considering any nooks, corners, or obstacles. Calculate the total square footage by multiplying the space length and width.
Then, divide the total square footage by the square footage coverage provided by each plywood sheet. This will determine the number of sheets required.
Consider any recommended expansion gaps or overlap requirements specified by the manufacturer.
For example, if the installation area is 100 square feet and each plywood sheet covers 32 square feet. You would need at least 4 sheets (100/32 = 3.125, round up to the nearest whole number).
The underlayment installation of vinyl flooring will go smoothly only if you properly prepare for installation, as maintained above.
Important Tip: Add a few extra sheets for potential mistakes, waste, or future repairs.
Step 4: Applying Construction Adhesive
Now the main fun starts.
The installation of plywood underlayment for vinyl flooring requires construction adhesive. As we all know we should apply the adhesive to the subfloor before laying down the plywood sheets. There is nothing new to it.
But the key part is, that you have to apply the adhesive in a zigzag pattern using a notched trowel. By doing so, you will be able to ensure even coverage and prevent any gaps or voids.
Step 5: Place the First Plywood Sheet
Start by placing the first plywood sheet along the vinyl floor in the corner of the room.
Make sure the sheet is level and square with the wall, then press down firmly to secure the sheet in place. Repeat this step with the remaining sheets, working your way across the room.
Finally, secure the sheets to each other with nails or screws.
Construction adhesive is applied to the subfloor to align the plywood sheet edges. Before screwing or nailing the plywood, ensure it is level and flush with the adhesive. Allow a small gap between the sheets.
Step 6: Continuing With the Installation Process
As you install plywood sheets, leave a 1/8-inch gap between them to allow for expansion. By doing so you prevent warping or buckling. Fix the pieces with screws or nails after applying adhesive, aligning the edges, and firmly pressing them in place.
Must See: Do I Need Expansion Gaps for Vinyl Flooring? (Explained)
Step 7: Cutting Plywood Sheets to Fit Around Obstacles
When installing vinyl flooring, underlayment sheets may need to be cut to fit around doors and vents. Carefully cut along the lines marked on the plywood sheet with a circular saw, or jig saw. Before attaching the cut piece, ensure it fits correctly around the object.
Step 8: Checking for Stability and Evenness
Before installing vinyl flooring, inspect the plywood underlayment for stability and consistency.
It is recommended to walk across the underlayment to identify any squeaky or uneven spots. If you find any, secure the plywood with additional screws or nails.
Read More on Vinyl Floors
- Do I Need Expansion Gaps for Vinyl Flooring? (Explained)
- Can you Caulk Around Vinyl Flooring? (All You Need to Know!)
- 5 Reasons Why Your Vinyl Plank Floor Buckling (Guide To Fix It)
- How to Fix Gaps in Vinyl Plank Flooring? (5 Easy Steps)
- NuCore vs. Lifeproof Vinyl Flooring – Which Is Better?